INTRODUCTION
So, now that I’ve collected the figures, I set out to paint them. The BAD Club has some frighteningly accomplished figure painters. I am not one of them. What follows is a version of a paint job by someone mediocre who’s created something that looks competent from a distance and is certainly good enough for wargaming (if not for winning painting competitions).
THE MATERIALS
The materials I used for the project were:
- Vallejo: All non-metallic paints;
- Army Painter: Undercoat spray; Matt Varnish;
- Games Workshop: Ink wash; metallic paints; basing materials (sand, snow and grass tuft effects).
Some “serious” wargamers are a little snobbish about GW products but I find their metallic paints and ink washes some of the best on the market.
STARTING OFF
Peter Pig figures are relatively free of flash, so cleaning them up was a relatively easy business. The next part of the process is to score the underside of the figure bases, plus top of the Battlefront FOW bases, to ensure that the PVA glue I use works effectively. PVA doesn’t really like smooth shiny surfaces.
Unlike Ancients or Horse & Musket period figures, the WWII bases for FOW lend themselves to contriving the figure locations so that it’s easy to get at for painting. So, much to the horror of purists, I base my WWII figures in their final position BEFORE painting.
Once the glue is dry, I then glue the sand on. Once that’s dry, the figures can then be spray undercoated. A couple of years ago I used a brown spray for a Hunnic army I assembled, because so many of the elements (horses, bows, spears, clothing) were brown anyway. However, I noticed that brown seemed to make a great base for every colour, so I’ve used it for all periods ever since.
After the basecoat has set, I then put on the first coat: flesh, followed by uniform, followed by equipment. My approach to the uniforms was based on photos in the Steven Zaloga book on the Bulge (plus of course the TV series Band of Brothers!). In effect, units seemed to have a hodge-podge of winter smocks (in white), greatcoats (in Feldgrau) and some poor souls in standard uniform. The Feldgrau I painted in the appropriate Vallejo colour, and the smocks in a sort of dirty grey.
After the first coat is set, the next stage is an ink wash, in GW’s Gryphonne Sepia. Good ink washes are such a bonus for mediocre painters such as me!
Once that has dried, it’s the final coat. This involves painting the raised areas of the figures in a lighter colour, so white in the case of smocks and Feldgrau (with a little white, but not too much) for the greatcoats.
I then tackled the bases. I simply glued on some GW snow, and then 1-3 grass tufts on each base. When the grass tufts has set, I glued some snow to those as well to give a frozen feel. All done…
The units I have finished are below. From back to front, they are: HQ (with the Major Moldenhauer equivalent to the front); first Sturm platoon; Schutzen platoon; second Sturm platoon.
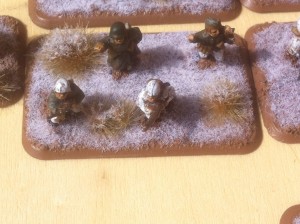
Close up of one of the infantry bases:
And the Major Moldenhauer figure:
Obviously, Moldenhauer was in 12 VG Division; I’ll need to research another officer for my 26VG, but otherwise use the same stats.
Next comes the tanks and guns.


