Squarebashing the Germans

The British now all painted (just waiting to be based)

brit_fin

…now I turn my attention to the Germans. After the usual clean up and hot glue to craft sticks they are ready to go. They are new ‘re-sculpted’ Peter Pig Germans. I haven’t seen the originals so cannot compare. When comparing to the BEF I would say that they are a little finer – the facial details are certainly finer.

The BEF had taken me longer than I really wanted, it been over 2 weeks (although I have been distracted). For the Germans my original plan was to undercoat white and gloopy wash grey and then varnish ‘stain’, in a similar way to the BEF. But instead I thought I would cut out a stage and go for a coloured primer. I would have normally used a car primer grey (which is light and neutral), but I thought I’d try an army painter primer. I originally looked at the wolf grey (to get a bluish hue), but thought it was a little too blue. The uniform grey seemed to fit the bill, and with that purchased it was down to spraying. I did go a light dusting of white over the figures in the first instance. When using the AP primers in the past I have found that you end up doing quite a heavy coat to cover all the bare metal. A tough of white primer first seems to alleviate that. It comes out a little brighter and stops a little of the capillary action pulling the paint into the recess.

After the priming I was pleasantly surprised that the grey had quite a blue hue to it anyway, so was I was looking for. It was a little dark though, and I did toy with the idea of airbrushing a highlight coat , or maybe a drybrush. BUT … I reigned myself in … this was meant to be a quick project.

germ1

So post the primer I blocked in the boots , rifle stock, pack and helmet.

Then it came to the varnish ‘dip’/’stain’. I suppose in my mind I was going to use AP dark tone. The £1 shop varnish I used last time does have a mahogany tint, and I didn’t really want to the lose the blue grey that I had achieved. The AP dark tone is based on an oily black rather than brown, so seemed to fit the bill. It also meant that the 2 protagonist armies would have a distinct tonal difference.

germ2

After that had dried , then I went back and did the face and hands. I like these to be bright, and doing this before the washes had a horrible dirtying effect. Then a bit of red piping , and a touch of metal. Then a matt varnish and the job is complete.

germ3

Overall I’m not as happy with these as the BEF. Greens and browns are much easier to pull together with this sort of wash technique. My complaints are , they are too dark for my tastes. germ4The AP dip is very strong. The base coat was a little too dark. If I had stuck to my original plan and gone white – acrylic wash , then I could have had more control and that stage does add a highlighting element. The overall figures just have a flat appearance with little in the way of contrast.germ5


That said its all about getting the soldiers on the table , for this project I can let it slide.

There are more Germans than British, so I will allow myself another 2 weeks to get these done. I should probably think of this in terms of 37 days … a countdown to war…

A little bit of squarebashing

After being caught up with all the centenary media (esp 37 Days), I thought that this year would be a good idea to do a little WW1. The remit of this project would that it would be up and running in a few weeks. Concentrating on the very early part of the war I needed to be playing while the period was still ‘hot’. With that in mind here is my tutorial on how to paint 200 infantry in about 2 weeks.

The first army will be the small British BEF. My preferred 15mm manufacturer being Peter Pig. The reasons being – neatly cast (no cleanup) , comprehensive range , quirky looking sculpts (with a reasonable high relief – more on that later)…. And finally ‘all round good eggs at PP’

With this in mind I will commit to do the whole of the army in a single ‘process batch’. Here are the steps –

prep1

Debag the figures.
Clean up (none), other than a scrape along the bottom to keep the base flat
Hot glue gun them lolly sticks (the large ‘tongue depressor’ type). Bagful for a £1 at a craft shop/works

prep2

Primer. I picked PSC German Dunkel Gelb for this job. It has a rather pleasing green hue, and it light and bright. As the project would be a ‘wash’ project then at this stage you can afford to be light and bright. The subsequent washes will bring it down (and I like bright!)

prep3

Primary Wash. Mix up a big batch of gloopy paint wash. There wasn’t much method to this. It was just a mix of khaki and green (Vallejo Brown violet) until it was an approximation of the colours I was aiming for.

prep4

Mix to milky consistency, a bit of acrylic flow improver (vital to avoid tide marks). But on a ‘spray primer’ I find that the surface tension means that you do get a good capillary action. The main worry is that this is too much and the paint pools. Flow improver is good for that. The best I’ve found is GW Lahmian medium (but it is expensive) and for smaller batches I’d recommend. But in this case I just use a cheapo (Windsor and Newton)..

prep5As you can see at this stage you don’t have to be be too fussy and can really blob it on. When it dries it will shrink back and you are trying to use the paint over the primer to do your shading.
At this point I’m going to block paint all the main areas of colour. So, webbing and pack with a lighter canvas colour, rifle stock brown. Not leave the face at this point. The face is the only thing I’m going to paint. The face is a focal point for the eye, do this well and all else if forgiven

Shading Wash. Once you this has dried (leave overnight) then comes the varnish wash. This is a red/brown/mahogany darkoakthat I bought from a £1 shop. Thinned down with turps to a very wet wash and lather it on. All the figure brightness will drop anyway at this point. You can use Army painter dips (which are probably better colour ranges) , but the only thing I find is that they give a waxy finish when dry and its hard to paint any detail over later. I might use AP dip for the Boche later. I like my cheap dip, as it had a Polyurethane finish and acts as a hard coat and can easily be painted over.

prep6

Leave to dry for 2 days. This stuff take a long time to dry, and is really stinky , so is best left outside (or in a shed)

Then it is really the home run.

Face painting. A orange brown base coat foe hands and face, then AP tanned flesh and AP barbarian flesh ( I bought a new brush for this, just for a crisp edge). As I said it you do a good face then all else will be overlooked. This triad does give quite a ruddy complexion , but as this was a decision to contrast with uniform (and bring out the greens) .. red and green been complementary on the colour wheel.
You may choice to put in a little paint over the webbing and bring out a strap or two.

fin1

The final stage being the matt varnish. I like a lead chromate based paint (outside job) , 1407 Rail Match Matt Varnish. I have been using this for 20 years and have found no equal (and I tried them all!)

fin2

 There will be more to come on my blog

www.lurkio.co.uk/blog

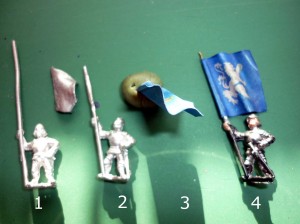
Ray’s flag method…

flag1

  1. Use existing standard bearer or pike man with bear flag pole, or
  2. Cut off cast-on flag then grind down / file pole using “Dremel “ type router.
  3.  Prepare paper flag around wire template with diameter slightly less than pole/pike. This ensures that final push fit is snug. Use “Pritt Stick” when gluing sides of flags together. Form folds, gently crease against wire & remove from former before glue dries.
  4. Super glue in point made from flattened & shaped brass tube; this only needs to extend into paper flag by about 5mm to ensure that most of the hollow is available to slip over pole/pike, as illustrated.

NB: push fit of the final product enables flags to be swapped on a temporary basis (best varnish the flag if you anticipate frequent handling). Alternatively it super-glued to the pole for permanent fix.

This is my new – more simple – system for making standard bearers without  having to drill the pike/pole to take thin wire. However, if the figure does not have a cast on pole then this system still works if you pre-fix one make from plain wire or brass tube.

Ray Boyles. August 2013

Refighting the Attack on Bizory 19th December 1944: Part One Creating the 26th Volksgrenadier Division

Background

A perhaps throwaway remark by Pete Gregory (a.k.a. Dr Doom) that the Burton club should maybe refight part of the Battle of the Bulge to commemorate its seventieth year, suddenly brought back memories of my first ever wargaming. In the early 80s, armed with a bunch of 20mm Airfix and Esci tanks and figures, the Ardennes was the first figure gaming I did. So I was more inspired by this proposition than I otherwise would be and threw myself into this project. OK, so Flames of War is a little more sophisticated than the rules I developed back in the heyday of the new Romantic movement, but no less valid nonetheless.

This is the first in a series of projects setting out how I went about the project. The object of the project is to get both an army and terrain ready for shows in the latter half of 2014, as part of a demonstration game.


The Choice of Battle

Taking my lead from both the FoW supplement “Nuts”, and also Steven Zaloga’s contribution to the Osprey Campaign series “Battle of the Bulge (2)”, and of course episodes 6 and 7 of “Band of Brothers”, I decided that for me the scenario I chose had to be part of the larger Battle for Bastogne.

A lot of the fighting round Bastogne was grinding, a battle of artillery with little movement. However, one of the exceptions was the fight for the village of Bizory, which guarded the eastern approaches to Bastogne. This has quite an exciting narrative: an attack on the village by the 26th Volksgrenadier Division, supported by elements of Panzer Lehr. The village was defended by an Engineer Battalion, who managed to hold on until they were rescued by the 501st parachute Infantry Division of the 101st Airborne, supported by accurate artillery fire. This fight seems ideal for my purposes.


Designing the Army List

And not for me the glamorous Panzer Divisions or the SS…no, I decided to go for the workhorses of the Wehrmacht in the Ardennes, one of the Volksgrenadier Divisions. The 26th VG Division was the one that attacked Bizory. There is no list for the 26th in “Nuts”, but there are options for both the 12th VG Division (very good) and the 277th VG (poor). Given that the quality of the 26th seemed excellent (described by Danny Parker in “Hitler’s Last Gamble” as the “best German infantry Division in the Ardennes”, I decided to model the list on the 12th.


The army I’m putting together comprises:

  • Volksgrenadier HQ (plus Panzershrek squads)
  • A Sturn platoon (with 3 sections)
  • A Sturm platoon (with 2 sections)
  • A Schutzen platoon (with 2 sections)
  • A Mortar platoon (80mm)
  • A machine gun platoon
  • A Volksgrenadier Scout platoon
  • A Tank-hunter platoon with StuG G’s
  • A Panzer platoon with PzIV J’s
  • An Anti-tank platoon with Soviet PaK36(r) guns

This is first and foremost an army for a demo game not a competition, hence many of the choices. So, the 26th, in its attack on Bizory, was supported by Kampfgruppe Fallois of Panzer Lehr (whose tanks were PzIVs, not Panthers. And the 26th had an embedded Panzer Jaeger Company, comprising StuGs, not Hetzers.

An observer will also notice the lack of heavy artillery, aircraft and AA capabilities. Well, at 15mm scale, artillery always looks better off table. And the weather on the 19th December didn’t permit any aircraft intervening.


Assembling the figures

Keen to assemble an army at a modest price, I looked to see what I had already. I still have a horde of Peter Pig Germans from the late 90s. They formed the basis of the army, but to those I added a load more new Peter Pig’s in Smocks and Greatcoats, to give a winter feel.


I was also fortunate enough to already possess the StuG’s I needed. In fact all I had to get on the vehicle front were some PzIVs. And I’ve already bought these, with the lovely panzers designed by the Plastic Soldier Company. Now all I have to do is paint the things!


IMG_0106

BADcon FoG:AM – AAR – Later Crusaders vs Fatamid Egyptians

The 19th Burton and District competition started bright and breezy for us.

The Crusader army we picked was based on the following plan. With 32 bases of armoured defensive spear this was to act as a buttress while the Knights would deploy in reserve and either to the flank or centre (The military order being drilled could act as either fire brigade or exploitation force as required. The 2 blocks of Crossbowmen would deploy last where needed. So often these guys are in the wrong place. Not being the best troops in the world we thought that they needed some advantage. Also deploying 16 bases of shooters might shore up a hanging and certainly drive of any light mounted troops ahead of them. Here is the list –

list

Our opponents in the first game was the illustrious Hammy and Martin with their Fatamid Egyptians. The list was something along the lines of

  • 3 BGs of 9 bases of protected defensive spear
  • 2 BGs of Mamluks (Sup/Arm/Bow/Sw)
  • 6 BGs of Arab/Syrian lancers ( various grades from Arm/Sup to Avg/Unprot)
  • 2 BGs of LH with Bow/Sw
  • And a couple of LF BGs with bow

So about 15 BGs

With a PBI of 0, we lost the roll off, but our opponents passed the initiative. This happening in 3 out of 4 games. I’m not sure why people think that was such as good idea. Against a sluggish army like the Crusaders they largely like to be pinned back. Really this avoids the gaps in the line opening up too early. If you can deploy sensibly (with a reserve) then going second is no big issue (especially when you get the terrain advantage). In all of our games I didn’t feel like our opponents opening move was that much of an advantage. I would happily take this option ! As it happened it allowed our Crossbowmen to shine, where perhaps they might be considered mediocre.

game1_1

In this game terrain was largely irrelevant. A couple of bits of rough going in the flanks , back on the edges. Certainly a 4’ wide section in the centre. Our deployment was to plan. The 32 bases of spear in centre (each group of 2 8s would be supported by 1 4 of Armenian MF (great filler)) We left a 16cm gap in the centre which could be closed by the spear or occupied by Knights or Crossbowmen. The Military order were centre rear. The Armenian Knights and Crusading Knights were deployed on the right (which with hindsight was a slight mistake). The Crossbowmen were split, one in a field to the left to shore up that flank and one to rear centre.

The Fatamids deployed in largely similar fashion. Their spear rear centre. Mamluks deployed in front centre. Our right flank had 2 Syrian (Superior) Lancers and 2 BG of LH. The Left flank had 2 more Syrian Lancers and 2 Arab Lancers (lesser quality ), and a bit of LF Bow.

From setup it looked reasonable for us. Our spear was better (armour), although less numerous. The Cavalry on both flanks we held a slight advantage, in quality , but we were less numerous in bases and BGs.

game1_2

Their opening move was to send the LF and LH forward to hold us back. The Mamluks raced forward to start their shooting. We ambled forward, not committing any reserves. On the right flank the LH started peppering the KN and tempting them to charge. With 2 BG of KN vs. 2 BG of LH it wasn’t too bad , there would have to be exceptional set of circumstances to break those (more of that later!) . The Syrians on our right didn’t fancy the 2 BGs of Crusading Knights bearing down on them and did a swift handbrake turn and moved back to a safer centre rear position. On our left flank the general plan as I saw it was to envelop us with the Arab lancers while holding us in the centre with the spear and better Cavalry.

Our spears pressed on and the gap closed. The Mamluks started to shoot, but because they couldn’t gang up on any target the odds weren’t in their favour. 4 dice needing 5’s ,requiring 3 hits for a test and 4 for a minus… while the spear had rear support and general. Not much of sporter. As the spears closed the centre it was time to commit the Military order, to the our left. On our right there was a general swing inward. The LH were doing nothing and the chargers were swinging in towards meatier targets.

game1_3

The crux came as the lined closed to 4-5’ on the left one Military order was facing off 2 units of Syrian lancers. All BGs had a general in tow as no-one wanted to fail the test to charge. Being drilled it meant a 5 thought but they would have 2 tests each turn, so it was in our advantage to wait. We were trying to wiggle a spear unit to get closer and get in-between the cavalry standoff. This meant that the Berber spearmen were pushed to prevent that. Then as luck would have it Hammy failed one of the 2 tests that he needed to make. The impact was brutal. The Knights were a POA up, re-rolling 1 &2s … the Syrians needing 5 (thought re-rolling 1&2s). The Knights of Jerusalem were triumphal. They won the combat. The Syrians lost a base and disrupted – Perfect. In the ensuing melee the Syrians fragmented. In our turn we just pushed everything forward. The Mamluks were a bit squashed, with Berber spearmen directly to the rear. But it wasn’t in our interest to charge, as they were superior with a general, we weathered the shooting. But now our crossbowmen had moved up with all the enemy committed (pinned), we could then just start shooting the end of the Mamluk line with 4 crossbow shots.

game1_4

The Syrians to the left broke, and the rampant knights smashed into the other Syrian lancers unit behind. With their best cavalry ½ shattered and the other ½ now being outnumbered, the Fatamid saw this as a do or die moment ( they didn’t want drilled lancers floating around to the rear of their lines). SO, they charged en-masse in the centre. The fights were level and there were a lot of dice. For the spear BG that was closest the left most lancers, it was a tale of woe that Hammy will be dining out on for a while.. I should mention at this point my daughter was in charge of dice duty. In the impact were we were level, and they needed some luck (as they would be down in melee for armour). She rolled the first 6 dice , and rolled 6 5&6s (showing off as 4s would be OK). Hammys dice were poor and he only got a couple. He disrupted, it was all looking ominous. Then to compound matters with another throw she threw 11 to kill the general. A general waver when through the Fatamid lines, and several other units dropped after seeing this calamity.

To the right a lancer units was trying to sneak through to get a charge in against the Crossbowmen that were shooting at the Mamluks. But they took 3 hits for their trouble and threw the ubiquitous 1 for their death roll and removed a base.

game1_5

The whole centre was wavering now. The left centre the second Syrian lancer was breaking… the next Berber spearmen held on briefly but soon broke. The ripple that this caused fragmented the last spear units that was behind the Mamluks, as our turn opened we charged a Spear BG as the Mamluks (who has contracted to avoid being shot , but therefore could not evade. The spear charge also targeted the fragmented Berber spear who didn’t stand. The whole Egyptian centre was now in flight.

With KN bearing down on the remaining right flank, the jig was up. We have a solitary fight on the very left flank were the Arab lancers manifested a charge into the crossbowem (in a field). With the loss of lance, disorder, and the bowmen getting support shooting that was only going one way

game1_6

The Fatimid’s lay crushed. We have only lost 2 bases in the whole game and suffered 1 disruption. So would be a 25-0 .. a rare score and a perfect start for the Crusaders. Who prior to this had never won a game.